Feeds:
Posts
Comments

Caprese Risotto

About a month ago I got an Aerogarden. I had been looking at them for a long time and Ed finally convinced me to get one when we saw it for more than half off at Sams Club. I started off growing mint, parsley, oregano, thyme, chives, and two types of basil. Well it turns out that the basil grows very abundantly. We have already had to cut it down at least 3 times. Each time I added the cuttings to a glass of water over the sink, determined not to waste them. This weekend Ed took me to Williams Sonoma to have me help pick out my Mother’s Day present. While I was wandering around I came across a Le Creuset french oven that was limited quantity, in fact there were only two left, at a great price. It was a 3 1/2 quart wide round oven. A lot of people might say that this oven is too small to do much of anything with but to me it just screamed risotto. The pans I have been using to make risotto are about 2 1/2 quart and that is just big enough and I have always wanted one with a larger bottom to saute the rice better. This oven would fit the bill perfectly! After thinking it over overnight we went back the next day and got it, Yay!!!! Anyways….the combination of this new “risotto” pan and the basil sitting on my windowsill gave me an idea. I decided that I would like to try and make a Caprese Risotto. I like both components individually so why not try them combined? When I went to make it tonight I decided to only use a cup of arborio instead of a cup and a half like usual because we always end up with so much leftover. Ed didn’t disagree and as he later admitted it was because he didn’t really believe that this would turn out well and he is usually the one that eats the leftovers. He admitted this to me as he was lamenting the fact that he didn’t tell me to go ahead and make the full amount because this turned out very good. In fact I couldn’t get him to come up with anything that should have been changed. From my opinion the risotto was very rich thanks to the chicken broth and trying vegetable broth might lighten it just a bit. I may or may not try that next time as this is a keeper just the way it is.
Caprese Risotto

Caprese Risotto 2 (I couldn’t get the sticker off. Oops.)

Caprese Risotto by Me

1 cup arborio rice
40oz chicken broth – you could substitute vegetable broth to make it vegetarian
1 1/2 tbsps olive oil
1/3 cup white wine – I used a riesling
2/3 cup shredded mozzarella cheese
4 roma tomatoes seeded and chopped
10 basil leaves julienned and cut in half
5 basil leaves torn in quarters

Heat chicken broth in medium sauce pan and keep warm throughout cooking.

Heat olive oil in a medium sauce pan. Add the torn basil leaves and saute for approx. 3 mins allowing the basil flavor to infuse into the olive oil. Remove basil pieces and discard. Add arborio rice and saute for a few minutes until rice becomes opaque. Add white wine and cook until absorbed. Start to add chicken broth to the rice in approx. 1/2 cup increments. Stir almost constantly while allowing each batch of chicken stock to be almost fully absorbed. Continue with this process till rice is no longer crunchy and the rice is nice and creamy.

Remove from the heat and add the mozzarella cheese combining well. Add the basil leaves and tomatoes folding them gently into the rice. Season with salt and pepper to taste.

Enjoy!!
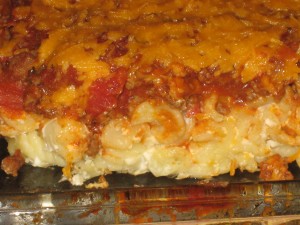
Taco Bake Casserole

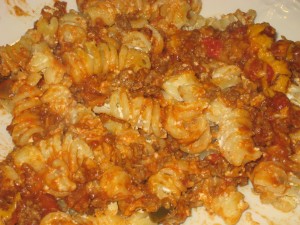
I first made a variation of this recipe about nine months ago and since then it has become a family favorite. Casseroles are great for many reasons. First, they are most always comfort food and who doesn’t need some of that? Second, they are usually easy to put together and most can be made a bit ahead of time. Third, there are always leftovers!! This casserole has the added benefit of giving me a taste that I sometimes crave, tacos, without all the prep work and messiness of regular tacos. Yesterday was Cinco De Mayo and even though this is not anywhere near a traditional mexican recipe it was a nod to the holiday. It was also a nice way for me to get back into cooking with a meal I knew would be loved by all. I hope your family enjoys this as much as we do.
Not pretty but oh so yummy!!
Not so pretty but oh so yummy!!!

I like to mix mine up!
I like to mix mine up.

Taco Bake Casserole

1lb ground beef
2 packets of taco seasoning
1 15oz can of tomato sauce
1 15oz can of diced tomatoes – you could use plain or ones with green chilies or jalapenos if you like
1/2 cup of your favorite salsa – I’ve used Chevy’s and Chi Chi’s medium
6oz softened cream cheese
6oz sour cream
12oz cheddar cheese – I like to use the taco flavored kind
12oz cooked short pasta – you could easily make 16oz of pasta to stretch this a little further, just make sure to increase the cream cheese and sour cream to 8oz each

Brown ground beef in a large, deep skillet. Drain. Add taco seasoning, tomato sauce, diced tomatoes, and salsa. Allow to simmer for approx. 20 mins.

In a medium bowl combine cream cheese and sour cream and mix well.

Coat a 9×13 casserole dish with cooking spray. Add the pasta and cream cheese/sour cream mixture and combine thoroughly. Layer the ground beef mixture evenly over the pasta. Top with cheddar cheese.

Bake in a 375 degree oven till cheese is thoroughly melted, approx. 20 mins.

Enjoy!!

Black Forest Pie

We went down to my parent’s house to visit recently and my mom requested that we bring a dessert that Gabriel had helped make. My first thought was the recent recipe that she had sent me for oatmeal raisin cookies that came from my Grammy. However it turns out that my dad does not like raisins so that idea was scratched. As I was sitting there thinking, the term “Black Forest” just popped into my mind. I’m not sure why as I have never made “Black Forest” anything and I never order it as a dessert, but never the less it did. My dad also doesn’t like cake which is the typical way one makes “Black Forest”. I decided that I thought that it might also make a good pie and be simple enough that Gabriel could help. So Black Forest Pie it was, only after making sure Dad liked cherries of course. This was incredibly simple to make and tasted very good. If you are looking for something quick and easy one day, or a variation of Black Forest cake, you might just want to give it a try. Unfortunately I have no picture but please don’t let that stop you!!!

Black Forest Pie by Me

1 premade chocolate graham cracker pie crust
1 box of chocolate pudding – I used the cooked kind but I imagine instant would work just as well as long as you split the mix and made each half seperately so the top layer was not already set prior to pouring
1 can of cherry pie filling

Cook pudding per package directions. Pour half the pudding into the pie crust, then spoon on the cherry pie filling (I didn’t quite use the whole can), and finally pour on the remaining pudding.

Allow to set for 3 hours. Top with whipped cream if you like.

Enjoy!!

Croque Monsieur

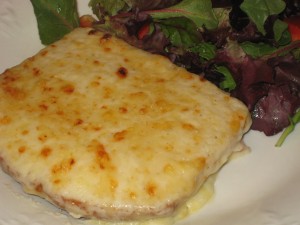
Better late than never, right?! This is my second recipe as part of the Barefoot Bloggers and Kathy of All Food Considered chose Croque Monsieur. This sandwich looked very interesting when I first glanced at the recipe. Who doesn’t like a good “grilled” cheese sandwich and this was definitely taking it up a notch. Although I should have made this a couple of weeks ago life got in the way but yesterday’s dreary afternoon seemed like the perfect time to make a sandwich that looked so yummy,warm, and comforting. I followed the recipe exactly except for not cutting off the top edge of the crust and adding a bit more ham and we really enjoyed the results. I think I would have liked a little more mustard as it really added to the depth of flavor. This was more time consuming than a normal grilled cheese but easy to prepare and a welcome change. Enjoy!

croque monsieur

Croque Monsieur by Ina Garten

Ingredients

* 2 tablespoons unsalted butter
* 3 tablespoons all-purpose flour
* 2 cups hot milk
* 1 teaspoon kosher salt
* 1/2 teaspoon freshly ground black pepper
* Pinch nutmeg
* 12 ounces Gruyere, grated (5 cups)
* 1/2 cup freshly grated Parmesan
* 16 slices white sandwich bread, crusts removed
* Dijon mustard
* 8 ounces baked Virginia ham, sliced but not paper thin

Directions

Preheat the oven to 400 degrees F.

Melt the butter over low heat in a small saucepan and add the flour all at once, stirring with a wooden spoon for 2 minutes. Slowly pour the hot milk into the butter–flour mixture and cook, whisking constantly, until the sauce is thickened. Off the heat add the salt, pepper, nutmeg, 1/2 cup grated Gruyere, and the Parmesan and set aside.

To toast the bread, place the slices on 2 baking sheets and bake for 5 minutes. Turn each slice and bake for another 2 minutes, until toasted.

Lightly brush half the toasted breads with mustard, add a slice of ham to each, and sprinkle with half the remaining Gruyere. Top with another piece of toasted bread. Slather the tops with the cheese sauce, sprinkle with the remaining Gruyere, and bake the sandwiches for 5 minutes. Turn on the broiler and broil for 3 to 5 minutes, or until the topping is bubbly and lightly browned. Serve hot.

Lemon Lime Bars

I saw a recipe for a lime bar that looked really easy and yummy. I love all things tart so I really wanted to try it. I then thought if a lime bar is good I bet a lemon lime bar might be even better. Then I thought that it is Easter time and it might be fun to dye the different layers yellow and green. Then I thought, and here’s where I went wrong, that it would be even prettier if I sprinkled it with powdered sugar and pink sugar crystals. Well the bars were delicious, the yellow and green layers were fun but the powdered sugar and pink sugar crystals were a total failure. When I first covered the bars it looked pretty but an hour later when I looked at them again the powdered sugar had all dissolved into the lime mixture and just left the pink crystals laying there looking pretty bad and sorta gross. Don’t worry I still ate them. So here they are. Give them a try, just leave off the topping (in fact I’m not even going to mention it in the recipe).

lemon lime bars

Lemon Lime Bars
adapted from Evil Shenanigans

1 1/2 cup graham cracker crumbs (best when prepared in a food processor)
6 tablespoons salted butter, melted
1/4 cup sugar
zest of one lime
2 large egg yolks
1-14 oz. can sweetened condensed milk separated into 2 7oz portions
1/4 cup lime juice
1/4 cup lemon juice
green and yellow food coloring

Preheat the oven to 350F and spray an 8″ square pan with butter flavored cooking spray. Line it with parchment paper that hangs over the edge of the pan by a few inches (so you can remove the bars from the pan more easily).

Combine the graham cracker crumbs, melted butter, sugar, and zest. Press into the prepared pan, pressing the crust mixture one inch up the side of the pan. Bake for 10 minutes. Allow to cool completely.

Once the crust is cooled in one bowl combine the 1 egg yolk and 7oz condensed milk until well mixed. Stir in the lime juice and 10 drops of green food coloring and mix thoroughly. It will begin to thicken slightly. In another bowl repeat the process using the lemon juice and yellow food coloring.

Pour the green mixture into the crust, making sure the filling reaches the edges and then carefully pour the yellow mixture on top of the green. Bake for 15 minutes, or until just set.

Cool to room temperature, then chill for at least one hour, overnight is better. Pull the bars out of the pan using the parchment paper and transfer to a cutting board. Cut into 16 squares with a serrated knife. To make cutting cleaner wipe the knife with a damp cloth between cuts.

BLTEs

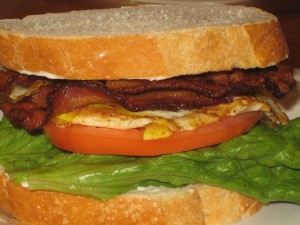
Well we all know that a BLT is a Bacon Lettuce, and Tomato sandwich. Now add an E to that and you get a Bacon, Lettuce, Tomato, and Extraordinary or Egg sandwich. The combination of flavors in this sandwich is wonderful and the contrast between warm and cold ingredients is refreshing. When we are looking for something simple, comforting, and fresh we turn to the BLTE. This sandwich leaves itself open to various adaptations or additions but make sure you always use fresh quality ingredients and you won’t be disappointed.

blte 2

BLTE by Me
makes 1 sandwich

2 slices of good Italian bread cut 1/2″ thick
2 slices of cooked thick cut bacon
1 fried(in butter with salt and pepper to taste) egg
1 slice of tomato
1 lettuce leaf
mayonnaise

Spread mayonnaise on both slices of bread. On one piece of bread layer lettuce, tomato, egg and bacon and cover with the other slice of bread.

Open wide and take a bite. Enjoy!!!

Crab Macaroni and Cheese

Saturday was turning out to be quite dreary and it was the last day of lent so I wanted something comforting but new and impressive for dinner that night. We had made it through lent without any meat but we still had one dinner to go. I had bought some crab meat about a week ago with the intention of making corn and crab bisque but that had not yet happened so when I came across a recipe for Crab Macaroni and Cheese that became “What’s For Dinner”. I had all the ingrediants except for some Fontina cheese. Unfortunately it did not appear that my local grocery store carried Fontina. However we did find Fontinella Cheese which we assumed had to be closely related but it turns out we were wrong. Since this turned out so delicious I guess that it didn’t matter that we were wrong, and since I still don’t know what it was suppose to taste like (I’m not sure what Fontina tastes like) I will pretend, and from now on state, that this was the perfect combination. Ed loved this! In the future I would lower the amount of liquid (maybe a 1/2 cup) as ours came out slightly soupy and I would love to add just a little Old Bay or maybe a bit of Sherry but this was an excellent recipe as is. Enjoy!!!

cab mac and cheese 2

Crab Macaroni and Cheese
adapted from Northwest Noshings who adapted it from Everyday Pasta by Giada De Laurentiis

12 ounces macaroni
1 ¾ cups whole milk
2 cups heavy cream (I ran out of heavy cream so I used 1 1/2 cups heavy cream and 1/2 cup regular whipping cream)
2 teaspoons all-purpose flour
½ teaspoon salt
¼ teaspoon freshly ground black pepper
1 cup (packed) grated fontinella cheese
¾ cup cheddar cheese (I used a mix of white and sharp cheddar)
½ cup (packed) finely grated Parmesan cheese
¼ cup (packed) grated mozzarella cheese (I used shredded)
¾ cup ricotta cheese
10 ounces Dungeness crab meat
4 TBSP breadcrumbs (I omitted)
2 TBSP unsalted butter, cut into 8 pieces (I omitted)

Preheat the oven to 450°F. Spray a 9 x 13 x 2-inch glass baking dish with a butter flavored cooking spray.

Cook the noodles in a large pot of boiling salted water until tender but still firm to the bite, stirring frequently, about 5 minutes (I cooked them for about 7 minutes). Drain well (do not rinse).

Whisk the milk, cream, flour, salt, and pepper in a large bowl to blend. Stir in the fontina, cheddar, Parmesan, mozzarella, and ricotta cheeses. Add the macaroni and toss to coat. Fold in crab meat.

Transfer the macaroni mixture to the prepared baking dish. Sprinkle breadcrumbs and place butter pieces on top of breadcrumbs.

Bake until the sauce bubbles and the cheese melts and begins to brown on top, about 15 minutes (It took ours closer to 25 minutes). Let stand for 10 minutes. Serve warm.

So tonight I had no idea what to do for dinner and it was after 7pm. Ed likes to eat by 7pm so this was not the best of circumstances. I did know that we would be having roasted green beans, as we had some of those to use up, but the rest of the meal was still a mystery. As I stood in the middle of the kitchen just looking around Ed reminded me that we had a lot of frozen fish in the freezer that we had not been using as frequently as he would have liked. Taking the hint I asked him what kind of fish he would like. His reply was the first one you grab. As it happened tuna was the closest at hand. When I made sushi bowls a while ago Ed came home with some Wasabi Sauce to use in the recipe. This was not near spicy enough for my tastes, I could eat a spoonful and not feel a thing, but it did have a very pleasant taste. I stood there and thought to myself “tuna and wasabi go very well together”. The question was how to keep the wasabi on the tuna while cooking. The answer…panko. This turned out surprisingly good. I thought that there wasn’t enough wasabi taste but Ed like the milder taste and raved about this meal. As I was eating I came up with many other ways to try and make this fish. 1. add powdered wasabi to beaten egg, coat, and dredge in panko. 2. sprinkle wasabi powder on tuna steaks directly and sear. 3.Coat in egg and add wasabi powder to the panko. Iam sure that there are still others. If you happen to try one of the other methods please let me know how it turned out. For now here is the process/recipe that I followed.

P.S. I served this with goat cheese and lemon infused quinoa.

panko and wasabi tuna

Panko and Wasabi Encrusted Tuna by Me

tuna steaks – we cooked 3
3/4 cup panko
1/3 cup Wasabi Sauce
olive oil for cooking

Coat tuna steaks in the wasabi sauce and then dredge (covering well) in panko.

Heat olive oil in a flat bottom pan. When hot add tuna steaks and cook for approx. 4 mins on each side and until coating is a nice medium brown.

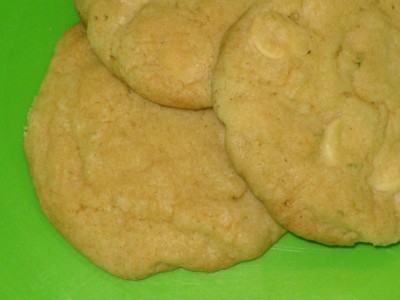
Dinner didn’t come out as well as I’d been hoping last night so I decided that we should make some cookies. Isn’t that what anyone would do? I had come across these White Chocolate and Lime cookies earlier in the day and they just kept calling to me. Partly because I love anything anything with lime in it and because they made me think of spring which I am anxiously awaiting. Well these didn’t bring about spring weather, as I am told it was actually snowing here today, but they were very tasty and Gabriel and I had fun making them. I didn’t change anything about the recipe. Next time however I will add a little more lime juice.

white chocolate and lime cookies

White Chocolate Lime Cookies from Evil Shenanigans
Yield 5 dozen cookies

1 cup unsalted butter, softened
3/4 cup sugar
3/4 cup light brown sugar
2 eggs
1 teaspoon vanilla
1 teaspoon lime juice
1 tablespoon lime zest
2 1/2 cups all-purpose flour
1 teaspoon baking soda
1/4 teaspoon baking powder
1/4 teaspoon salt
1 – 12 oz bag white chocolate chips

Preheat oven to 350 degrees and line two sheet pans with parchment paper.

In a large mixing bowl or stand mixer, sugar and butter until combined but not fluffy.

Add eggs one at a time, then add vanilla, lime juice and lime zest. Mix to combine.

Whisk together flours, baking soda, baking powder, and salt.

Mix into creamed mixture until just combined. Fold in the white chocolate chips.

Shape the dough into 1″ balls, and place 2 inches apart on the baking sheet. Bake for 10 minutes, or until the edges are golden and the centers are just set. ** Mine took 15 mins but that is probably because I only got 46 cookies out of the dough instead of 60 so mine where a little larger than what this recipe calls for.**

Allow to sit on the pan for three minutes before moving to wire racks.

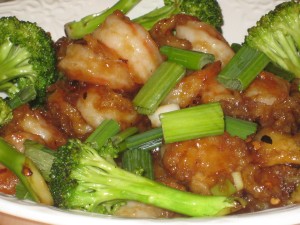
General Tso’s Shrimp

For Christmas, about 5 years ago, my parents gave me an awesome wok. It was an electric, professional quality wok. I had wanted one for awhile and was so excited when I opened that present and had such grand plans for it. I used it for the first time TODAY! This was a long time coming but I can now guarantee you that it will not be such a long wait til the next time. Today I made myself proud! This was one of the easiest and most delicious things I have ever made. I have enjoyed General Tso’s from many a Chinese restaurant but this surpassed a lot of them. It was light, sweet, and spicy all at once. Ed was in heaven but I had one reason to be a little sad. I now had one more thing that I was afraid that I would no longer be able to order out because it was better at home. I am so excited to submit this to the Tasty Tools Wok event hosted by Joelen’s Culinary Adventures. Check it out.

general tso's shrimp 2

General Tso’s Shrimp
adapted from Blog Chef

1lb peeled and deveined shrimp with tails removed – we used 31-40 count
3 eggs beaten
1/2 cup cornstarch
1/2 cup wok oil
3 tbsp rice vinegar
4 tbsp sherry
6 tbsp sugar
6 tbsp soy sauce
4 tsp cornstarch
1 tsp crushed red pepper
2 scallions sliced with white and green parts separated

In a large bowl combine the cornstarch and beaten eggs. Mix well to create a batter. Add the shrimp and coat well.

In a small bowl combine rice vinegar, sherry, soy sauce, sugar, the white parts of the scallion, and cornstarch. Mix well and set aside.

Add oil to wok and heat to 375 degrees. Add shrimp to the wok in batches and cook untill shrimp are white. Remove with a slotted spoon and set aside. *Note – when frying the shrimp a lot of the batter fell off. I am not sure how to really correct this problem but we did not feel that it took anything away from the finished dish.

Add crushed red peppers to the oil remaining in the wok and stir fry for about 30 seconds. Return the shrimp to the wok and stir fry for a minute or two.

Add sauce mixture to the wok and stir until the sauce becomes thickened and coats the shrimp well. Garnish with the green parts of the scallions.

Serve with broccoli and white rice

Enjoy!!